Guide to Long Exposure Photography
Guide to Long Exposure Photography: A Simple Guide to Capturing Stunning Water Shots
Long exposure photography is a technique that can transform ordinary scenes into breathtaking works of art. By extending the shutter speed on your camera, you can create stunning effects, particularly when photographing moving water. This blog post will walk you through what long exposure photography is, how it works, and how to set up your camera for success—without relying on guesswork or apps!
What Is Long Exposure Photography?
Long exposure photography involves using a slow shutter speed to capture a scene over an extended period of time. This technique is particularly popular for creating dreamy, ethereal effects with moving elements, such as water, clouds, or light trails.
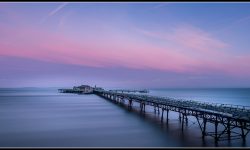
When photographing water, long exposures can smooth out waves, create a silky appearance in streams and waterfalls, or transform a choppy sea into a glass-like surface ir ice skating rink as I like to call it. It’s a favourite technique among landscape photographers for adding a sense of motion and mood to their images.

How to Set Up Your Camera for Long Exposure Photography
Setting up your camera for long exposure photography doesn’t have to be complicated. In fact, you can achieve perfect results without guessing or using apps. Here’s how:
1. Choose the Right Equipment
- Tripod: A sturdy tripod is essential to keep your camera stable during long exposures.
- Filters: Neutral density (ND) filters, such as 10-stop or 15-stop filters, help reduce the amount of light entering your lens, allowing for longer shutter speeds even in bright conditions.
- Remote Shutter Release: To avoid camera shake, use a remote release or your camera’s timer function.
2. Set Your Camera to Manual Mode
Switch to manual mode (M) so you have full control over shutter speed, aperture, and ISO.
3. Use the Right Settings
- Start by setting a low ISO (100 or 200) to minimise noise.
- Select a small aperture (f/11 to f/16) for a greater depth of field.
- Adjust the shutter speed to achieve the desired effect. For instance, a 20-30 second exposure will often create smooth, flowing water.
4. Calculate Your Exposure Time
If you’re using a 10-stop or 15-stop ND filter, you’ll need to adjust your shutter speed significantly. Here’s a simple trick to avoid the guesswork:
- Take a test shot without the filter to determine the correct exposure.
- Add the filter and extend the shutter speed according to the filter’s light reduction. For example, if your initial shutter speed is 1/30 second, a 10-stop filter will require approximately 30 seconds.
5. Focus Before Adding the Filter
ND filters can make it hard to see through your viewfinder or screen. Focus your shot before attaching the filter to your lens.
Why You Don’t Need Apps
Many photographers rely on apps to calculate exposure times with ND filters, but this can slow you down and add unnecessary complexity. By mastering the simple trick, you can work more efficiently and focus on capturing the perfect shot.

Guide to Long Exposure Photography
Step-by-Step Workflow
I offer a full step-by-step workflow in the above video, but in brief...
- Camera on a tripod
- Compose your shot and set a focus point
(Turn your camera's lens to manual focus, if you don't use back button focus) - Camera to Manual Mode
- ISO to it's lowest number
- Aperture small (F11 is fine)
- Adjust your camera to 1/30th second
- Look at your histogram. If nothing is peaking, then you're ready to go. If the image looks too dark or too bright, then adjust your Aperture and/or ISO to achieve a perfect exposure.
DO NOT ADJUST YOUR SHUTTER SPEED!Now you're ready to add filters
- Add a 10-stop filter and adjust your camera shutter speed to 30 seconds
(1/30th of a second equates to 30-seconds when using a 10-stop filter) - Require a longer shutter speed? no problem, simply close your aperture by one stop (3 clicks) eg. F11 to F16 and then lengthen your shutter speed to 1-minute.
Repeat this process to extend further.

Tips for Photographing Water
- Look for Movement: Waves, waterfalls, and flowing streams make excellent subjects for long exposures.
- Shoot at Golden Hour: The soft light at sunrise or sunset enhances the dreamy effect of long exposure photography.
- Experiment: Try different shutter speeds to see how they affect the final image.

Final Thoughts
Long exposure photography is a rewarding technique that can elevate your landscape photography to the next level. By following these steps, you’ll be able to capture stunning water shots without the frustration of trial and error. With a bit of practice, you’ll master the art of long exposures and wonder how you ever managed without this method!
If you’ve found this guide helpful, check out my YouTube channel for more photography tips and tutorials. Happy shooting!
LINKS:
► YOUTUBE CHANNEL - CLICK
► WORKSHOPS - CLICK
► MORE ABOUT ME - CLICK
► PERSONAL WEBSITE - CLICK
► FACEBOOK - CLICK
► INSTAGRAM - CLICK