
Wire Wool Photography Tutorial
Perfect step-by-step Guide for Wire Wool Photography
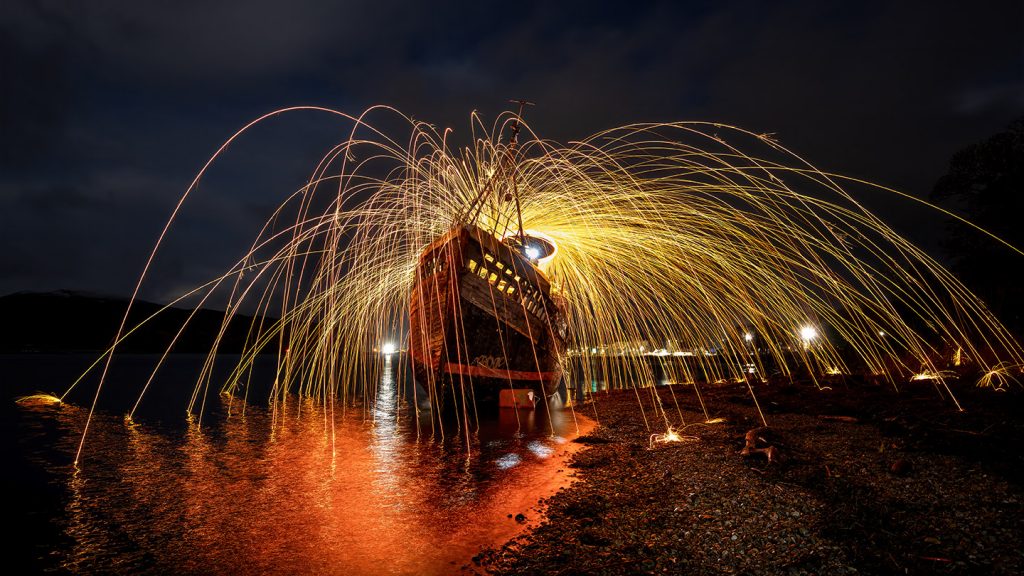
Introduction: Wire wool photography, or steel wool photography, is a captivating and visually stunning form of long-exposure photography that involves spinning burning steel wool to create mesmerizing light trails. This guide will walk you through the process of creating captivating wire wool photographs, from gathering the necessary equipment to mastering the technique.
Before you read the beak-down, let me make this easy to understand.
- Buy a cheap metal whisk.
- Attach a short length of string to the whisk
- Purchase Wire Wool (0000 grade only)
- Stuff the wire wool into the whisk (not too tight)
- Light a tiny bit of wool and twirl!
WARNING - THE SPARKS WILL BE EXTREMELY HOT AND WILL EITHER BURN YOU OR WHATEVER THEY TOUCH!
I WOULD SUGGEST TRYING THIS BY THE SEA, AWAY FROM ANYTHING THAT COULD CATCH FIRE, AND WEARING PROTECTIVE CLOTHING!
DO NOT IGNORE THIS WARNING!
- Place your camera on a tripod.
- Set your camera to *BULB mode.
- Aperture to 5.6
- ISO to 200
- Attach a remote trigger and take the shot!
*If you don't have a remote, set your shutter speed to 10 seconds and go from there.
If the image is too dark, then raise your ISO

Wire Wool Photography Tutorial
Chapter 1: Understanding Wire Wool Photography
1.1 What is Wire Wool Photography?
- Definition and explanation of wire wool photography.
- Brief history and evolution of the art form.
- Examples of wire wool photography to inspire.
1.2 Importance of Safety Precautions
- Highlighting the potential risks involved.
- Safety gear required for wire wool photography.
- Tips for ensuring a safe shooting environment.
Chapter 2: Equipment Needed for Wire Wool Photography
2.1 Camera Gear
- DSLR or mirrorless camera.
- Tripod for stability.
- Remote shutter release or self-timer.
2.2 Lighting Equipment
- LED flashlight or headlamp for focusing in the dark.
- Additional lighting sources for creative effects (optional).
2.3 Steel Wool and Whisk
- Grade 00 or 00 00 steel wool.
- Stainless steel whisk or wire wool holder.
2.4 Safety Gear
- Protective gloves.
- Safety goggles or glasses.
- Fire extinguisher or water source.
Wire Wool Photography Tutorial Step-by-Step Guide

Chapter 3: Preparing for the Shoot
3.1 Location Scouting
- Selecting a suitable shooting location.
- Considering safety and legal regulations.
- Assessing ambient lighting conditions.
3.2 Composition Planning
- Identifying interesting foregrounds and backgrounds.
- Planning the trajectory of the spinning steel wool.
- Visualizing the desired light trails.
3.3 Setting Up the Camera
- Mounting the camera securely on the tripod.
- Adjusting camera settings for long exposure.
- Testing exposure and focus settings.
Chapter 4: Executing the Wire Wool Spin
4.1 Preparing the Steel Wool
- Pulling apart the steel wool to increase surface area.
- Stuffing the steel wool into the whisk securely.
4.2 Igniting the Steel Wool
- Ensuring a safe distance from flammable objects.
- Using a lighter or 9-volt battery to ignite the steel wool.
- Spinning the whisk to disperse burning embers.
4.3 Spinning Technique
- Holding the whisk securely at arm's length.
- Initiating the spin with a smooth and controlled motion.
- Experimenting with different spinning speeds and directions.
Chapter 5: Capturing the Shot
5.1 Initiating the Exposure
- Triggering the camera shutter using a remote release or self-timer.
- Maintaining a steady hand to avoid camera shake.
5.2 Long Exposure Settings
- Adjusting shutter speed for desired exposure time.
- Selecting an appropriate aperture for depth of field.
- Setting ISO to the lowest value for optimal image quality.
- Use BULB Mode.
5.3 Reviewing and Adjusting
- Checking the preview image for exposure and composition.
- Making necessary adjustments to camera settings.
- Experimenting with multiple exposures for varied results.
Chapter 6: Post-Processing Wire Wool Photographs
6.1 Importing Images
- Transferring images from camera to computer or mobile device.
6.2 Basic Editing
- Adjusting exposure, contrast, and white balance if needed.
- Cropping and straightening for composition enhancement.
6.3 Creative Editing Techniques
- Adding colour toning or gradients for artistic effect.
- Applying selective adjustments to highlight specific areas.
- Experimenting with different editing styles to match the mood.
Chapter 7: Showcasing Your Work
7.1 Social Media Sharing
- Uploading wire wool photographs to platforms like Instagram and Flickr.
- Engaging with the photography community and sharing insights.
7.2 Print and Exhibition
- Printing wire wool photographs for display in galleries or exhibitions.
- Participating in photography contests and showcases.
Conclusion: Wire wool photography offers a unique and visually captivating way to experiment with long-exposure techniques. By following this comprehensive guide, you can safely and effectively create stunning light trail images that showcase your creativity and technical skill. Remember to prioritize safety at all times and have fun exploring the endless possibilities of wire wool photography.
Have fun, but be safe!
Gary
LINKS:
► YOUTUBE CHANNEL - CLICK
► WORKSHOPS - CLICK
► MORE ABOUT ME - CLICK
► PERSONAL WEBSITE - CLICK
► FACEBOOK - CLICK
► INSTAGRAM - CLICK
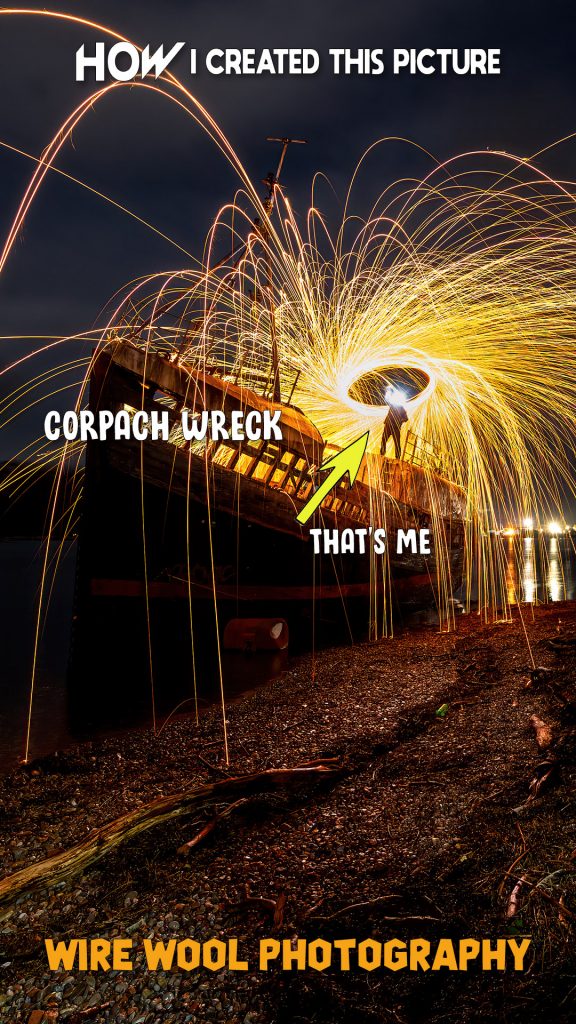
The Shipwreck is commonly known as the Corpach Wreck.
Frequently asked questions:
- How do I do Wire Wool Photography?
- What equipment do you need for Wire Wool Photography?
- Where is the Corpach Wreck?
Google Maps
W3W: ///format.defected.thrillers
